Introduction

This blog post guides you through setting up a robust data pipeline ideal for handling real-time data streams. We’ll use Apache Kafka for data distribution, Spring Boot for our application framework, Avro for efficient data serialization, and MongoDB as our flexible document database. Think of this pipeline as the backbone for applications like IoT sensor monitoring, where data needs to flow seamlessly from generation to analysis.
The Blog will be seperated into multiple parts so you can use only the parts you need for your application, if not join me on our ride, where we will deploy multiple microservices around Kafka :)
By the end of this article, you’ll have:
- A Spring Boot producer generating simulated sensor data
- Apache Kafka deployed locally, streaming the generated data
- Data reliably flowing into a MongoDB database via Kafka Connect
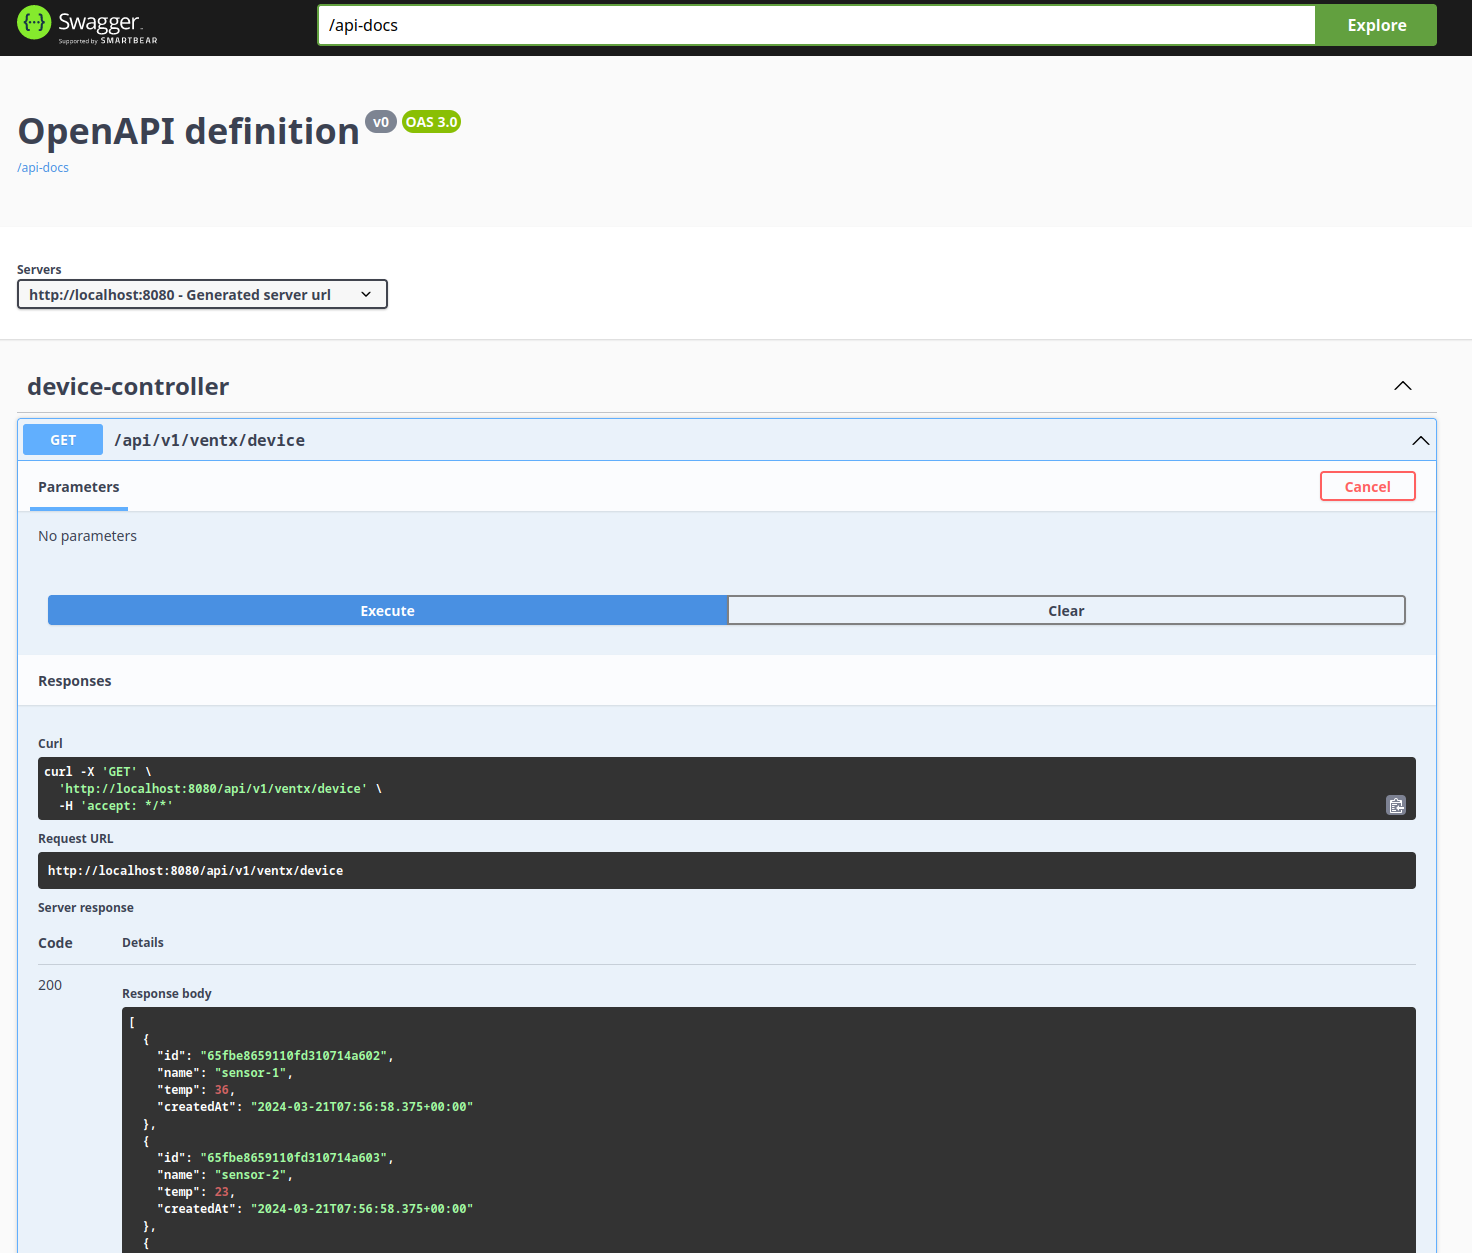
- A Spring Boot application serving the data as REST API with an OpenAPI Swagger Documentation
Prerequisites
- Docker
- Docker Compose
- Spring Boot and Java 17
General Setup
1. Customizing Kafka Connect
Create connect.Dockerfile: This file tells Docker how to build a customized Kafka Connect image that includes the MongoDB plugin. Here’s what it should contain:
FROM confluentinc/cp-kafka-connect:7.2.5
RUN confluent-hub install --no-prompt --verbose mongodb/kafka-connect-mongodb:latest
ENV CONNECT_PLUGIN_PATH="/usr/share/java,/usr/share/confluent-hub-components"
2. MongoDB Connector Configuration
Create mongodb_sink.json: This file defines how Kafka Connect will interact with MongoDB. Place the provided JSON code into this file.
{
    "name": "mongo-devices-sink",
    "config": {
      "connector.class": "com.mongodb.kafka.connect.MongoSinkConnector", //Plugin
      "topics": "devices", // Kafka Topic
      "connection.uri": "mongodb://root:example@mongo:27017", // MongoDB Connection uri
      "key.converter": "org.apache.kafka.connect.storage.StringConverter",
      "value.converter": "io.confluent.connect.avro.AvroConverter", // Important as we will use a avro object
      "value.converter.schemas.enable": true,
      "value.converter.schema.registry.url" : "http://schema-registry:8081", // Kafka Schema Registry
      "database": "admin", // your database
      "collection": "devices", // your collection
      "timeseries.timefield": "createdAt", // we will simulate sensor data
      "timeseries.timefield.auto.convert": "true", // so in order to convert the timestamps correctly
      "timeseries.timefield.auto.convert.date.format": "yyyy-MM-dd'T'HH:mm:ss'Z'" // we give in a date format
    }
  }
3. Creating the Connector
Create setup-mongo-sink.sh: This script automates sending your configuration to Kafka Connect to create the connector. Use the script code provided.
#!/bin/bash

curl connect:8083/connector-plugins
curl -X POST -H "Content-Type: application/json" -d @mongodb_sink.json http://connect:8083/connectors
curl http://connect:8083/connectors/mongo-devices-sink/status
4. Setting up the Containers
Create docker-compose.yml: This file is the blueprint for our entire setup: MongoDB, Kafka components, and our customized Kafka Connect. Paste the provided YAML code into it.
Note
At the end of the docker-compose.yml a service called init-container: is defined, which just initializes the Kafka Connect container with setup-mongo-sink.sh and mongodb_sink.json, which are mounted onto it.
The init-container will execute the scripts if the health-check of Kafka Connects endpoint is successful.
I’m using my own little toolkit container ghcr.io/alberthahn/cloud-swiss-army-knife-essentials:master, but you can use any image you like, which has curl on it.
version: '3.1'

services:

  # MongoDB
  mongo:
    image: mongo
    restart: always
    container_name: mongo
    depends_on:
      - zookeeper
      - broker
    ports:
      - 27017:27017
    environment:
      MONGO_INITDB_ROOT_USERNAME: root
      MONGO_INITDB_ROOT_PASSWORD: example

  mongo-express:
    image: mongo-express
    restart: always
    ports:
      - 8085:8081
    environment:
      ME_CONFIG_MONGODB_ADMINUSERNAME: root
      ME_CONFIG_MONGODB_ADMINPASSWORD: example
      ME_CONFIG_MONGODB_URL: mongodb://root:example@mongo:27017/

  # Kafka
  zookeeper:
    image: confluentinc/cp-zookeeper:7.2.2
    container_name: zookeeper
    environment:
      ZOOKEEPER_CLIENT_PORT: 2181
      ZOOKEEPER_TICK_TIME: 2000
    ports:
      - 22181:2181

  broker:
    image: confluentinc/cp-kafka:7.2.2
    container_name: broker
    depends_on:
      - zookeeper
    ports:
      - 29092:29092
      - 29093:29093
      - 29094:29094
      - 9092:9092
    environment:
      KAFKA_BROKER_ID: 1
      KAFKA_ZOOKEEPER_CONNECT: zookeeper:2181
      KAFKA_ADVERTISED_LISTENERS: PLAINTEXT://broker:29092, LISTENER_CONNECT://broker:9092,LISTENER_PRODUCER://broker:29093,LISTENER_CONSUMER://localhost:29094
      KAFKA_LISTENER_SECURITY_PROTOCOL_MAP: PLAINTEXT:PLAINTEXT, LISTENER_CONNECT:PLAINTEXT,LISTENER_PRODUCER:PLAINTEXT,LISTENER_CONSUMER:PLAINTEXT
      KAFKA_INTER_BROKER_LISTENER_NAME: LISTENER_CONNECT
      KAFKA_OFFSETS_TOPIC_REPLICATION_FACTOR: 1

  schema-registry:
    image: confluentinc/cp-schema-registry:7.2.2
    hostname: schema-registry
    container_name: schema-registry
    depends_on:
      - broker
    ports:
      - 8081:8081
    environment:
      SCHEMA_REGISTRY_HOST_NAME: schema-registry
      SCHEMA_REGISTRY_KAFKASTORE_BOOTSTRAP_SERVERS: "broker:29092"
      SCHEMA_REGISTRY_KAFKASTORE_CONNECTION_URL: "zookeeper:2181"
      SCHEMA_REGISTRY_LISTENERS: http://0.0.0.0:8081

  connect:
    build:
      context: .
      dockerfile: connect.Dockerfile
    ports:
      - "8083:8083"
    hostname: connect
    container_name: connect
    depends_on:
      - zookeeper
      - broker
      - schema-registry
    environment:
      CONNECT_BOOTSTRAP_SERVERS: "broker:29092"
      CONNECT_REST_ADVERTISED_HOST_NAME: connect
      CONNECT_REST_PORT: 8083
      CONNECT_GROUP_ID: compose-connect-group
      CONNECT_CONFIG_STORAGE_TOPIC: docker-connect-configs
      CONNECT_CONFIG_STORAGE_REPLICATION_FACTOR: 1
      CONNECT_OFFSET_FLUSH_INTERVAL_MS: 10000
      CONNECT_OFFSET_STORAGE_TOPIC: docker-connect-offsets
      CONNECT_OFFSET_STORAGE_REPLICATION_FACTOR: 1
      CONNECT_STATUS_STORAGE_TOPIC: docker-connect-status
      CONNECT_STATUS_STORAGE_REPLICATION_FACTOR: 1
      CONNECT_ZOOKEEPER_CONNECT: "zookeeper:2181"
      CONNECT_PLUGIN_PATH: "/usr/share/java,/usr/share/confluent-hub-components"
      CONNECT_KEY_CONVERTER: org.apache.kafka.connect.storage.StringConverter
      CONNECT_VALUE_CONVERTER: io.confluent.connect.avro.AvroConverter
      CONNECT_VALUE_CONVERTER_SCHEMA_REGISTRY_URL: http://schema-registry:8081
      KAFKA_CONFLUENT_SCHEMA_REGISTRY_URL: http://schema-registry:8081
    healthcheck:
      test: ["CMD", "curl", "-f", "http://connect:8083"]
      interval: 1m30s
      timeout: 10s
      retries: 3
      start_period: 40s
      start_interval: 15s

  init-container:
    image: ghcr.io/alberthahn/cloud-swiss-army-knife-essentials:master
    container_name: init_container
    depends_on:
      connect:
        condition: service_healthy
    command: [ "bash", "-c", "./setup-mongo-sink.sh"]
    volumes:
      - ./setup-mongo-sink.sh:/setup-mongo-sink.sh
      - ./mongodb_sink.json:/mongodb_sink.json
5. Deployment
Now let’s deploy these bad boys with docker
docker-compose up
Producer
Initialize a Spring Boot Project with your prefered IDE or on https://start.spring.io/.
- Project: Maven
- Language: Java
- Spring Boot Version: 17
1. Adding dependencies
Add these dependencies to your pom.xml
Confluent maven repository
    <repositories>
        <repository>
            <id>confluent</id>
            <url>https://packages.confluent.io/maven/</url>
        </repository>
    </repositories>
dependencies
		<dependency>
			<groupId>org.springframework.boot</groupId>
			<artifactId>spring-boot-starter-web</artifactId>
		</dependency>
		<dependency>
			<groupId>org.springframework.kafka</groupId>
			<artifactId>spring-kafka</artifactId>
		</dependency>
		<dependency>
			<groupId>org.springframework.boot</groupId>
			<artifactId>spring-boot-starter-test</artifactId>
			<scope>test</scope>
		</dependency>
		<dependency>
			<groupId>org.springframework.kafka</groupId>
			<artifactId>spring-kafka-test</artifactId>
			<scope>test</scope>
		</dependency>
        <dependency>
            <groupId>org.apache.avro</groupId>
            <artifactId>avro</artifactId>
            <version>1.11.0</version>
        </dependency>
        <dependency>
            <groupId>io.confluent</groupId>
            <artifactId>kafka-avro-serializer</artifactId>
            <version>7.1.1</version>
        </dependency>
        <dependency>
            <groupId>io.confluent</groupId>
            <artifactId>kafka-schema-registry-client</artifactId>
            <version>7.1.1</version>
        </dependency>
		<dependency>
			<groupId>org.projectlombok</groupId>
			<artifactId>lombok</artifactId>
		</dependency>
At the build section add this plugin to plugins
			<plugin>
				<groupId>org.apache.avro</groupId>
				<artifactId>avro-maven-plugin</artifactId>
				<version>1.8.2</version>
				<executions>
					<execution>
						<id>schemas</id>
						<phase>generate-sources</phase>
						<goals>
							<goal>schema</goal>
							<goal>protocol</goal>
							<goal>idl-protocol</goal>
						</goals>
						<configuration>
							<sourceDirectory>${project.basedir}/src/main/resources/</sourceDirectory>
							<outputDirectory>${project.basedir}/src/main/java/</outputDirectory>
						</configuration>
					</execution>
				</executions>
			</plugin>
This creates an avro object that we define later on.
2. Creating the resources
Create resources/avro/device.avsc: This is the avro object that we define and register at the schema registry.
[
  {
    "type": "record",
    "namespace": "ventx.producer.avro",
    "name": "DeviceObject",
    "version": 1,
    "doc": "Device object",
    "fields": [
      {
        "name": "name",
        "type": "string",
        "avro.java.string": "String"
      },
      {
        "name": "temp",
        "type": "double"
      },
      {
        "name": "createdAt",
        "type": "long",
        "logicalType": "date"
      }
    ]
  }
]
Create resources/avro/application.yml: This file has all the properties for Kafka and the Spring Configuration.
# Properties
spring:
  kafka:
    bootstrap-servers: ${KAFKA_URI}
    properties:
      schema.registry.url: ${SCHEMA_URI}
      delivery.timeout.ms: 20000
      request.timeout.ms: 10000
    producer:
      key-serializer: org.apache.kafka.common.serialization.StringSerializer # Serializing the key of the obj
      value-serializer: io.confluent.kafka.serializers.KafkaAvroSerializer # Serializing the avro object we have created

topic:
  name: devices

server:
  port: 8091

# Custom Properties
scheduler:
  interval: "${SCHEDULER_INTERVAL_MS}" # Scheduler interval we can change to our liking
3. Creating the Sensor Simulator
Create KafkaTopicConfig.java: This is will build our topic.
@Configuration
public class KafkaTopicConfig {

    // The Value defined at the application.yml
    @Value("${topic.name}")
    public String topicName;

    @Bean
    public NewTopic devicesTopic() {
        return TopicBuilder.name(topicName)
                .build();
    }
}
Create DeviceSimulator.java: This is our main class, which will generate the sensor data and send it to the kafka cluster.
@Service
@EnableScheduling
@RequiredArgsConstructor
@EnableAsync
public class DeviceSimulator {

    @Value("${topic.name}")
    public String topicName;

    private final KafkaTemplate <String, DeviceObject> kafkaTemplate;
    private final Random random = new Random();
    private final DecimalFormat temperatureFormat = new DecimalFormat("#.#");

    @Bean
    @Async
    @Scheduled(fixedRateString = "${scheduler.interval}") // using the value of the application.yml
    public void sendDevicePayload(){

            Date now = new Date();
            // Randomly generate a temperature around 20-35
            double temperature = Double.parseDouble(temperatureFormat.format((random.nextDouble(15) + 20)));

            for (int i = 1; i <= 3; i++) {

                DeviceObject deviceObject = new DeviceObject(); // The avro object we have defined
                deviceObject.setName("sensor-" + i);
                // Creating temperature fluctuation with higher variability
                deviceObject.setTemp(temperature + random.nextInt((i == 2) ? 16 : 22) - ((i == 2) ? 6 : 8));
                deviceObject.setCreatedAt(now.getTime());
                kafkaTemplate.send(topicName, deviceObject); // sending it to the devices topic
            }

    }
}
Note
- @Enable Scheduling to execute the function to a defined interval that we pass through our application.yml
- @EnableAsync make the function in the class non-blocking and asynchronous, if the cluster connection fails.
4. Wrap it all up
Create env.sh: This has the environmental variables for the application.yml
#!/bin/bash

export KAFKA_URI="localhost:29093"
export SCHEDULER_INTERVAL_MS="10000"
export SCHEMA_URI="http://localhost:8081"
Source the variables and start the Spring Boot Application
source env.sh
./mvnw spring-boot:run
5. See the results in your mongodb
In the docker-compose file we also created mongo-express, which gives you access to your mongodb with an UI. Go to http://localhost:8085 login with the default credentials.
- Username: admin
- Password: pass

Backend
Initialize a Spring Boot Project with your prefered IDE or on https://start.spring.io/.
- Project: Maven
- Language: Java
- Spring Boot Version: 17
1. Adding dependencies
Add these dependencies to your pom.xml
We will be using lombok to avoid boilerplate code in our class creation.
		<dependency>
			<groupId>org.springframework.boot</groupId>
			<artifactId>spring-boot-starter-web</artifactId>
		</dependency>
		<dependency>
			<groupId>org.projectlombok</groupId>
			<artifactId>lombok</artifactId>
			<optional>true</optional>
		</dependency>
		<dependency>
            <groupId>jakarta.persistence</groupId>
            <artifactId>jakarta.persistence-api</artifactId>
 		</dependency>
		 <dependency>
			<groupId>org.mapstruct</groupId>
			<artifactId>mapstruct</artifactId>
			<version>1.5.3.Final</version>
		</dependency>
		<dependency>
			<groupId>org.mapstruct</groupId>
			<artifactId>mapstruct-processor</artifactId>
			<version>1.5.3.Final</version>
		</dependency>
		<dependency>
			<groupId>org.springframework.boot</groupId>
			<artifactId>spring-boot-starter-validation</artifactId>
		</dependency>
		<dependency>
			<groupId>org.springframework.boot</groupId>
			<artifactId>spring-boot-starter-data-mongodb</artifactId>
		</dependency>
		<dependency>
			<groupId>org.springframework.boot</groupId>
			<artifactId>spring-boot-starter-test</artifactId>
			<scope>test</scope>
		</dependency>
		<dependency>
			<groupId>org.springdoc</groupId>
			<artifactId>springdoc-openapi-starter-webmvc-ui</artifactId>
			<version>2.2.0</version>
		</dependency>
2. Configure properties
Add these variables to your application.properties
spring.data.mongodb.uri=${MONGODB_URI}
springdoc.api-docs.path=/api-docs
mongodb.database="admin" # The database you want to access
mongodb.collection="devices" # The collection you're looking for
3. Create a MongoDB Configuration
Create MongoDBConfiguration.java: This creates the mongoClient and connection to the DB.
@Configuration
public class MongoDBConfiguration {

    // The MongoDB uri we defined previously
    @Value("${spring.data.mongodb.uri}")
    private String connectionString;

    // https://www.mongodb.com/docs/drivers/java/sync/current/fundamentals/data-formats/pojo-customization/
    @Bean
    public MongoClient mongoClient() {
        CodecRegistry pojoCodecRegistry = fromProviders(PojoCodecProvider.builder().automatic(true).build());
        CodecRegistry codecRegistry = fromRegistries(MongoClientSettings.getDefaultCodecRegistry(), pojoCodecRegistry);
        return MongoClients.create(MongoClientSettings.builder()
                                                      .applyConnectionString(new ConnectionString(connectionString))
                                                      .codecRegistry(codecRegistry)
                                                      .build());
    }

}
4. Creating the REST API and it’s classes
Create a directory called device, this will include all our implementation for CRUD-Operations on the Database and the REST Controller. (To not over extend the Article I will only include the read operations)
├── device
│   ├── DeviceController.java
│   ├── DeviceDTO.java
│   ├── DeviceEntity.java
│   ├── DeviceMapper.java
│   ├── DeviceRepository.java
│   ├── DeviceRepositoryMongoDB.java
│   ├── DeviceServiceImpl.java
│   └── DeviceService.java
4.1 Data Transfer Object (DTO)
Create DeviceDTO.java: This will define our Data Object. Note that the access for schemas are read only. (We don’t want create our own Id’s and the timestamp will be created, when you create the entry)
@Data (Lombok): this annotation provides auto-generation of getters, setters etc.
@Data
public class DeviceDTO {

    @Schema(accessMode = Schema.AccessMode.READ_ONLY, example = "65fbe93a9110fd310714a60e")
    private String id;

    @NotNull
    @Schema(example = "sensor-1")
    private String name;

    @NotNull
    @Schema(example = "35.2")
    private double temp;

    @Schema(accessMode = Schema.AccessMode.READ_ONLY)
    private Date createdAt;

}
4.2 Device Entity
Create DeviceEntity.java: This will define our Entity.
Using @Entity (Jakarta) is necessary since we intend to persist this data in a database.
@Data
@Entity
public class DeviceEntity {

    @Id
    private ObjectId id;

    private String name;

    private double temp;

    private Date createdAt;

}
4.3 Device Mapper
Create DeviceMapper.java: This will Map our DeviceDTO to Entities and even provide mappings to a list of DTO’s and Entities.
@Mapper(componentModel = "spring")
public interface DeviceMapper {

    @Mapping(target ="id", expression="java(convertStringToObjectId(deviceDTO.getId()))")
    DeviceEntity toDevice(DeviceDTO deviceDTO);
    List<DeviceEntity> toDevices(List<DeviceDTO> devicesDTO);

    @Mapping(target ="id", expression="java(convertObjectIdToString(device.getId()))")
    DeviceDTO toDeviceDTO(DeviceEntity device);
    List<DeviceDTO> toDevicesDTO(List<DeviceEntity> devices);


    default String convertObjectIdToString(ObjectId id) {
        return id == null ? new ObjectId().toHexString() : id.toHexString();
    }

    default ObjectId convertStringToObjectId(String id) {
        return id == null ? new ObjectId() : new ObjectId(id);
    }
}
4.4 Device Repository
Create DeviceRepository.java: This is the interface for our Repository functions.
@Repository
public interface DeviceRepository {

    List<DeviceEntity> findAll();

    List<DeviceEntity> findAll(List<String> ids);

    DeviceEntity findOne(String id);

    List<DeviceEntity> findByName(String name);

    long count();
}
4.5 Device Repository MongoDB implementation
Create DeviceRepositoryMongoDB.java: This is the actual implmentation of our interaction between the mongoDB and our REST API.
@Repository
public class DeviceRepositoryMongoDB implements DeviceRepository {

    @Value("${mongodb.database}")
    private String mongoDBDatabase;

    @Value("${mongodb.collection}")
    private String mongoDBCollection;

    private static final TransactionOptions txnOptions = TransactionOptions.builder()
                                                                           .readPreference(ReadPreference.primary())
                                                                           .readConcern(ReadConcern.MAJORITY)
                                                                           .writeConcern(WriteConcern.MAJORITY)
                                                                           .build();
    private final MongoClient client;
    private MongoCollection<DeviceEntity> deviceCollection;

    public DeviceRepositoryMongoDB(MongoClient mongoClient) {
        this.client = mongoClient;
    }

    @PostConstruct
    void init() {
        deviceCollection = client.getDatabase(mongoDBDatabase).getCollection(mongoDBCollection, DeviceEntity.class);
    }

    @Override
    public List<DeviceEntity> findAll() {
        return deviceCollection.find().into(new ArrayList<>());
    }

    @Override
    public List<DeviceEntity> findAll(List<String> ids) {
        return deviceCollection.find(in("_id", mapToObjectIds(ids))).into(new ArrayList<>());
    }

    @Override
    public DeviceEntity findOne(String id) {
        return deviceCollection.find(eq("_id", new ObjectId(id))).first();
    }

    @Override
    public List<DeviceEntity> findByName(String name) {
        return deviceCollection.find(in("name", name)).into(new ArrayList<>());
    }

    @Override
    public long count() {
        return deviceCollection.countDocuments();
    }

    private List<ObjectId> mapToObjectIds(List<String> ids) {
        return ids.stream().map(ObjectId::new).toList();
    }
}
4.6 Device Service
Create DeviceService.java: This class is serving the operations provided by our service implementation, when we use the repository to read from the Database.
public interface DeviceService {

    List<DeviceDTO> findAll();

    List<DeviceDTO> findAll(List<String> ids);

    DeviceDTO findOne(String id);

    List<DeviceDTO> findByName(String name);

    long count();
}
4.7 Device Service Implementation
Create DeviceServiceImpl.java: This is the service implementation of our repository operations, which can now be used by a REST-Controller.
@Service
@RequiredArgsConstructor
public class DeviceServiceImpl implements DeviceService {

    private final DeviceRepository deviceRepository;
    private final DeviceMapper deviceMapper;

    @Override
    public List<DeviceDTO> findAll() {
        return deviceMapper.toDevicesDTO(deviceRepository.findAll());
    }

    @Override
    public List<DeviceDTO> findAll(List<String> ids) {
        return deviceMapper.toDevicesDTO(deviceRepository.findAll(ids));
    }

    @Override
    public DeviceDTO findOne(String id) {
        return deviceMapper.toDeviceDTO(deviceRepository.findOne(id));
    }

    @Override
    public List<DeviceDTO> findByName(String name) {
        return deviceMapper.toDevicesDTO(deviceRepository.findByName(name));
    }

    @Override
    public long count() {
        return deviceRepository.count();
    }

}
4.8 Device Controller
Create DeviceController.java: Last but not at least, our Controller which serves out HTTP endpoints to clients.
@RestController
@RequestMapping("/api/v1/")
@RequiredArgsConstructor
public class DeviceController {

    private final DeviceService deviceService;

    @GetMapping("/device/find/{id}")
    public DeviceDTO getDevice(@PathVariable String id) {
        return deviceService.findOne(id);
    }

    @GetMapping("/device/{ids}")5ByName(@PathVariable String name) {
        return deviceService.findByName(name);
    }

    @GetMapping("/device")
    public List<DeviceDTO> getDevices() {
        return deviceService.findAll();
    }

    @GetMapping("/devices/count")
    public long getCount() {
        return deviceService.count();
    }

}
5. Wrap it all up
Create env.sh: This has the environmental variables for the application.yml
#!/bin/bash

export MONGODB_URI="mongodb://root:example@mongo:27017/admin"
export MONGODB_DB="admin"
export MONGODB_COL="devices"
Source the variables and start the Spring Boot Application
source env.sh
./mvnw spring-boot:run
You should now see the devices, that are already saved in your DB!
Dockerize
Create Dockerfile: In each of your newly generated projects. Mine are called producer and backend.
FROM maven:3.9-eclipse-temurin-17 as maven
COPY . .
RUN mvn clean package -B -DskipTests
FROM eclipse-temurin:17
COPY --from=maven target/*.jar app.jar
CMD ["java", "-jar", "/app.jar"]
Add it to your docker-compose.yml
  backend:
    image: backend
    container_name: backend
    build: ./backend
    depends_on:
      - mongo
    ports:
      - 8080:8080
    environment:
      MONGODB_URI: mongodb://root:example@mongo:27017/admin
      MONGODB_DB: "admin"
      MONGODB_COL: "devices"

  producer:
    image: device-producer
    container_name: producer
    build: ./producer
    restart: always
    depends_on:
      - connect
      - broker
      - schema-registry
    ports:
      - 8090:8090
    environment:
      KAFKA_URI: broker:29093
      SCHEMA_URI: http://schema-registry:8081
      SCHEDULER_INTERVAL_MS: "60000"

  #...your kafka and mongodb stuff
Now let’s deploy these bad boys again with docker
docker-compose up
Conclusion
Congrats! You made it to the end! 🥳
You have now a working producer that simulates data and automatically sinks it into your database, which can be reached via your backend microservice to serve data to a frontend! Built upon it!