Introduction
In this blog post I’m happy to guide you through the process of setting up the Flux image update automation feature. In our case it will scan a GitLab container registry for new image versions and automatically updates the manifests (Helm chart releases) in your GitLab repository to always reflect the most up to date image tag. The Helm chart release will then be deployed to the Kubernetes cluster to run your application with the new image version. All without having to do a single manual step. Pretty cool, right? 😎
Prerequisites
This guide is specifically made for those who are already using the GitLab container registry for their own container image builds and you should already use Flux to manage your Kubernetes applications within a GitLab repository.
The image update automation components are not installed by default, so you may need to add following extra components to your Flux bootstrap command and run it again.
--components-extra=image-reflector-controller,image=automation-controller
The complete bootstrap command will look something like this:
export GITLAB_TOKEN=<gitlab_project_access_token>

flux bootstrap gitlab \
--token-auth \
--hostname=<gitlab_domain> \
--owner=<gitlab_user_or_group> \
--repository=<gitlab_repository_name> \
--branch=<main_or_master> \
--path=<path_in_repository> \
--components-extra=image-reflector-controller,image-automation-controller
You can find more information on how to deploy Flux on a cluster connected to a GitLab repository here.
Also, make sure you’ve cloned the GitLab repository locally.
How does it work?
Let’s have a closer look on how the Flux image update automation works for our scenario:

(1) The image-reflector-controller and image-automation-controller are both part of the flux-system namespace within the Kubernetes cluster and are the core components of the image update automation.
(2) The Flux image update automation will be configured with three different configuration manifests (YAML files) inside your Git repository:
- The
image-repositories.yamlfor configuring the ImageRepository object(s). - The
image-policies.yamlfor configuring the ImagePolicy object(s). - The
image-update-automation.yamlfor configuring the ImageUpdateAutomation object(s).
(3) The image-reflector-controller authenticates to the GitLab container registry usinge a Kubernetes secret of type kubernetes.io/dockerconfigjson and fetches the available image tags of the container registry. These tags are then represented in the ImageRepository object and filtered by the ImagePolicy object.
(4) The image-automation-controller takes the configuration of the ImageUpdateAutomation object and updates the Helm chart releases based on the latest image selected by the ImagePolicy object by committing the changes to your Git repository.
How to set it up?
To set up the Flux image update automation with your GitLab container registry just follow the steps below.
Note: If the Flux image update automation has been already set up in the cluster and you just want to add the image scan/update for another image, you can simply skip step 4 and append the genereated configuration manifests to the already existing files in the Git repository.
Step 1: Configure access to your GitLab container registry
The Kubernetes cluster needs a secret of type kubernetes.io/dockerconfigjson in order to authenticate to your GitLab container registry. You will then configure Flux to use the Kubernetes secret in the ImageRepository object later in this post.
Create a GitLab deploy token
In the GitLab project for your container registry go to Settings → Repository → Deploy tokens to create a new deploy token. Enter a descriptive name like Pull my-app images, a username like my-app-image-puller, and select the read_registry scope. You shouldn’t give this token any other permissions to lower the attack vector if exposed.
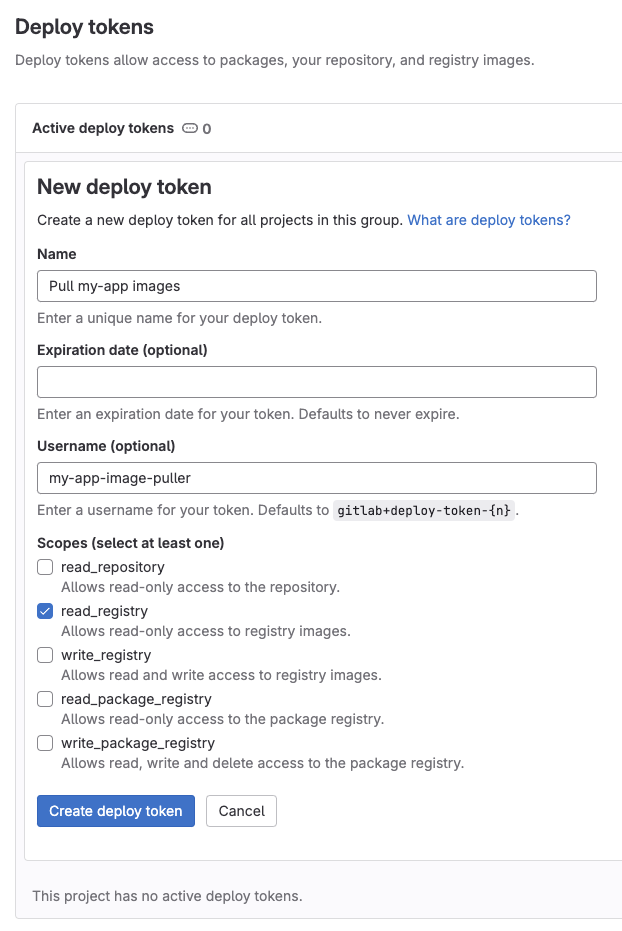
You’ll end up with a password. Copy it as you won’t see it again. 😉

Create a Kubernetes secret
Create a Kubernetes secret of type kubernetes.io/dockerconfigjson by running following command:
kubectl create secret docker-registry <secret_name> \
--docker-server=<gitlab_container_registry> \
--docker-username=<gitlab_deploy_token_username> \
--docker-password=<gitlab_deploy_token_password> \
--docker-email=<your_email> \
-n flux-system
where:
<secret_name>is the name of the Kubernetes secret you want to create. I.e.my-app.<container_registry>is your private GitLab container registry FQDN.<deploy_token_username>is the username of the GitLab deploy token you’ve just created.<deploy_token_password>is the password of the GitLab deploy token you’ve just created.<your_email>is your GitLab email address.
If you just want to get the manifest (YAML file) without applying it directly to the cluster, simply append…
--dry-run=client \
-o yaml > my-app-secret.yaml
…to the end of the command.
Step 2: Create the ImageRepository object
Create the ImageRepository object to tell Flux which container registry to scan for new tags.
Run following command to generate the manifest:
flux create image repository <repository_name> \
--image=<container_registry> \
--secret-ref <secret_name> \
--export > ./my-cluster/image-repositories.yaml
where:
<repository_name>is the name of the ImageRepository object you want to create. I.e.my-app.<container_registry>is your private GitLab container registry FQDN.<secret_name>is the name of the Kubernetes secret you’ve created in step 1.
Export the manifest directly into your Git repository.
After execution you’ll end up with a manifest similar to this one:
---
apiVersion: image.toolkit.fluxcd.io/v1beta2
kind: ImageRepository
metadata:
  name: my-app
  namespace: flux-system
spec:
  image: gitlab.example.com/docker-images/my-app
  interval: 1m0s
  secretRef:
    name: my-app
Step 3: Create the ImagePolicy object
Create the ImagePolicy object to tell Flux to select the latest image tag.
Run following command to generate the manifest:
flux create image policy <policy_name> \
--image-ref=<repository_name> \
--select-numeric=asc \
--export > ./my-cluster/image-policies.yaml
where:
<policy_name>is the name of the ImagePolicy object you want to create. I.e.my-app.<repository_name>is the name of the ImageRepository object you’ve created in step 2.
There are three different image policies available: SemVer, Alphabetical, and Numerical. As our tags are in a numeric format which increases for each new image build, we need to use --select-numeric=asc.
However, you might want to use a different image policy. You can find more information about the different options here.
Export the manifest directly into your Git repository.
After execution you’ll end up with a manifest similar to this one:
---
apiVersion: image.toolkit.fluxcd.io/v1beta2
kind: ImagePolicy
metadata:
  name: my-app
  namespace: flux-system
spec:
  imageRepositoryRef:
    name: my-app
  policy:
    numerical:
      order: asc
Step 4: Create the ImageUpdateAutomation object
Create the ImageUpdateAutomation object to tell Flux which Git repository to write the image updates to.
Run following command to generate the manifest:
flux create image update <image_update_automation_name> \
--interval=5m \
--git-repo-ref=flux-system \
--git-repo-path="./my-cluster" \
--checkout-branch=master \
--push-branch=master \
--author-name=fluxcdbot \
--author-email=fluxcdbot@example.com \
--commit-template="{{range .Updated.Images}}{{println .}}{{end}}" \
--export > ./my-cluster/image-update-automation.yaml
where:
<image_update_automation_name>is the name of the ImageUpdateAutomation object you want to create. I.e.auto-image-updater.--intervalis the source sync interval.--git-repo-refis the Git repository resource. The default name isflux-systembut you may want to verify it by runningflux get sources git.--git-repo-pathis the path to the directory containing the manifests to be updated.--checkout-branchis the branch to check out.--push-branchis the branch to push commits to. You can use a different branch than the one used for checkout, if you want to open a pull request against the checkout branch.--author-nameis the name to use for the Git commits.--author-emailis the email to use for the Git commits.--commit-templateis the Git commit message.
Export the manifest directly into your Git repository.
After execution you’ll end up with a manifest similar to this one:
---
apiVersion: image.toolkit.fluxcd.io/v1beta1
kind: ImageUpdateAutomation
metadata:
  name: auto-image-updater
  namespace: flux-system
spec:
  git:
    checkout:
      ref:
        branch: master
    commit:
      author:
        name: fluxcdbot
        email: fluxcdbot@example.com
      messageTemplate: |
        Automated image update

        Automation name: {{ .AutomationObject }}

        Files:
        {{ range $filename, $_ := .Updated.Files -}}
        - {{ $filename }}
        {{ end -}}

        Objects:
        {{ range $resource, $_ := .Updated.Objects -}}
        - {{ $resource.Kind }} {{ $resource.Name }}
        {{ end -}}

        Images:
        {{ range .Updated.Images -}}
        - {{.}}
        {{ end -}}
    push:
      branch: master
  interval: 5m0s
  sourceRef:
    kind: GitRepository
    name: flux-system
  update:
    path: ./my-cluster
    strategy: Setters
You can adjust the .spec.git.commit.messageTemplate field to customize the commit message.
Step 5: Edit your Helm chart release
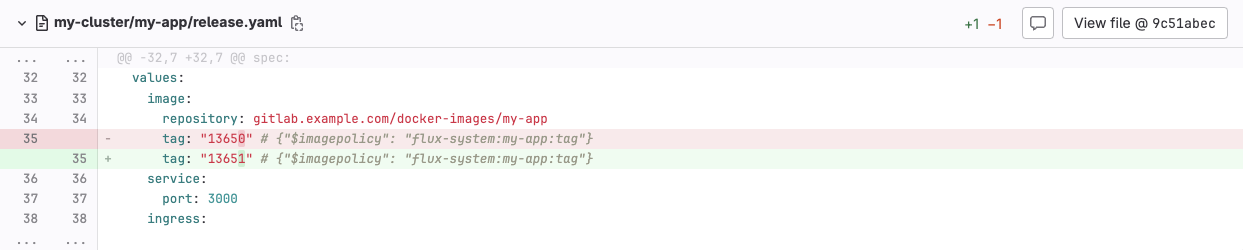
Edit your Helm chart release in the Git repostory and add a marker to tell Flux which policy to use when updating the container image. This is done by adding the comment # {"$imagepolicy": "flux-system:my-app:tag"} behind the tag field.
spec:
values:
  image:
    repository: gitlab.example.com/docker-images/my-app
    tag: "13650" # {"$imagepolicy": "flux-system:my-app:tag"}
Step 6: Apply the changes and check the status
Finally, commit and push the changes to your Git repository in order to apply the changes to the cluster.
git add -A && \
git commit -m "Add image update automation for my-app" && \
git push
Wait for Flux to pull and apply the changes. If this takes to long you can use following command to trigger a reconcilation.
flux reconcile kustomization flux-system --with-source
Monitor the status
Print the status of the ImageRepository object(s):
flux get image repository
NAME LAST SCAN SUSPENDED READY MESSAGE
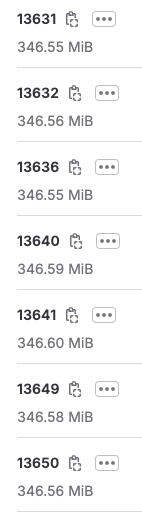
my-app 2024-01-31T13:41:19+01:00 False True successful scan: found 7 tags
Print the status of the ImagePolicy object(s):
flux get image policy

NAME    LATEST IMAGE                                   READY   MESSAGE
my-app  gitlab.example.com/docker-images/my-app:13651  True    Latest image tag for 'gitlab.example.com/docker-images/my-app' resolved to 13651
Print the status of the ImageUpdateAutomation object(s):
flux get image update

NAME                LAST RUN                    SUSPENDED   READY   MESSAGE
auto-image-updater  2024-01-31T14:23:55+01:00   False       True    no updates made; last commit 945e1ce at 2024-01-31T13:14:31Z
After a while you should see an auto commit from the fluxcdbot with the commit message we configured in the .spec.git.commit.messageTemplate field of the ImageUpdateAutomation object in step 4.

You can see that the image tag was successfully updated to reflect the newest image version.
Conclusion
You’ve made it! 👏
Thanks for following me through the process of setting up the Flux image update automation.
I hope this blog post was helpful and gave you an understanding on how powerful the Flux image update automation can be once integrated into your Kubernetes application deployment workflow.