Why use OIDC?
When building CI/CD Pipelines to automate the process of deploying resources in AWS via Code (IaC - Infrastructure as Code) you need to give your pipeline runner permission to deploy those resources.
The standard way to do so is to create credentials, which are then e.g. saved in your gitlab repository variables. These keys need to be rotated by you after around 90 days for your application to stay secure. This might be fine if you only have one repository, but in real life situations you most of the time might be facing a situation with way more repos. You would need to take track of when to rotate the keys for each individually if you are working with keys.
Seems like a lot of things to keep in mind and to take care of - and with that many ways to - at some point - make a mistake.
But there is a more elegant way, one that doesn’t require you to handle keys at all: OIDC.
And while more and more services are adding OIDC as a way to let developers authenticate services and users without having to manage keys or passwords, AWS and gitlab already has the integration needed.
How it works
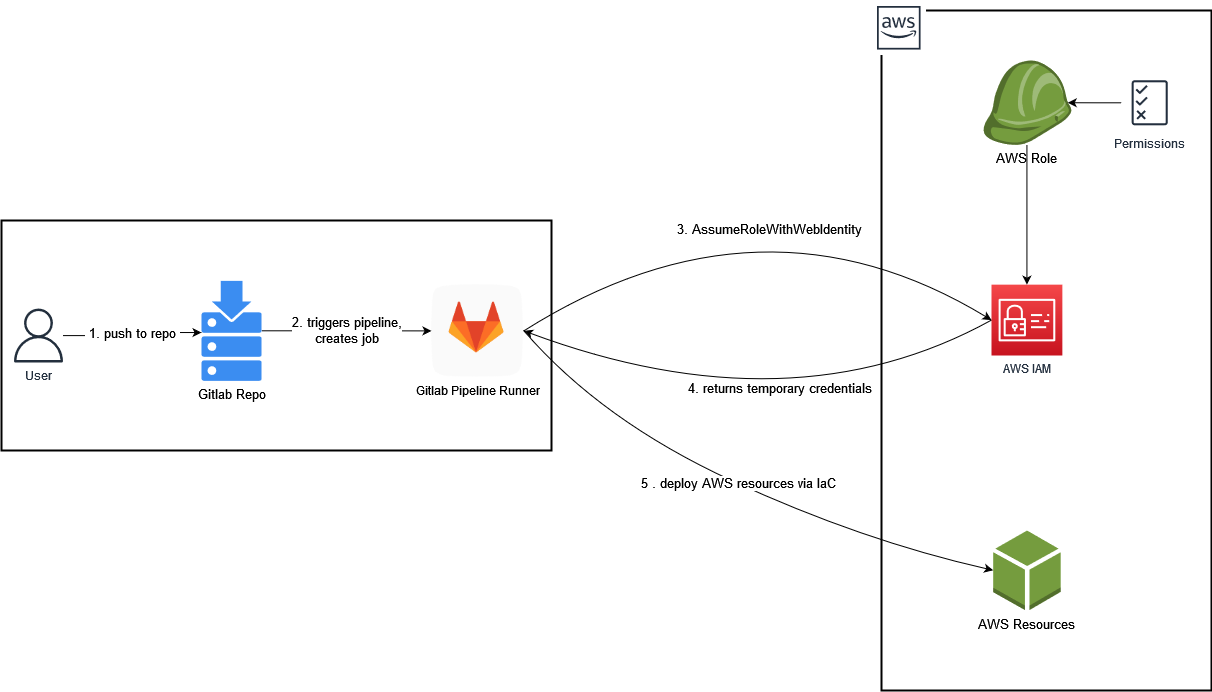
As depicted in the diagram:
(1) We push our IaC code changes to our gitlab repository
(2) The Pipeline gets triggered and creates a job, which will be executed by a gitlab runner instance that holds the JWT (Json Web Token) signed by gitlab.
(3) The runner uses its token to assume a role via the AssumeRoleWithWebIdentity call.
(4) AWS then returns a set of temporary credentials that can be used by our pipeline runner.
(5) The runner is now authorized to access AWS and create the resources we defined within our IaC-Code.
The credentials will automatically expire shortly after that.
How to set up OIDC
All you need is to set up your source control management system (we will be using gitlab) as your identity provider within AWS, create an AWS role that has the needed permissions and add it to your gitlab CI/CD pipeline.
AWS Identity Provider
To add a new identity provider to your AWS environment, head to IAM > Identity Providers > Add Provider .
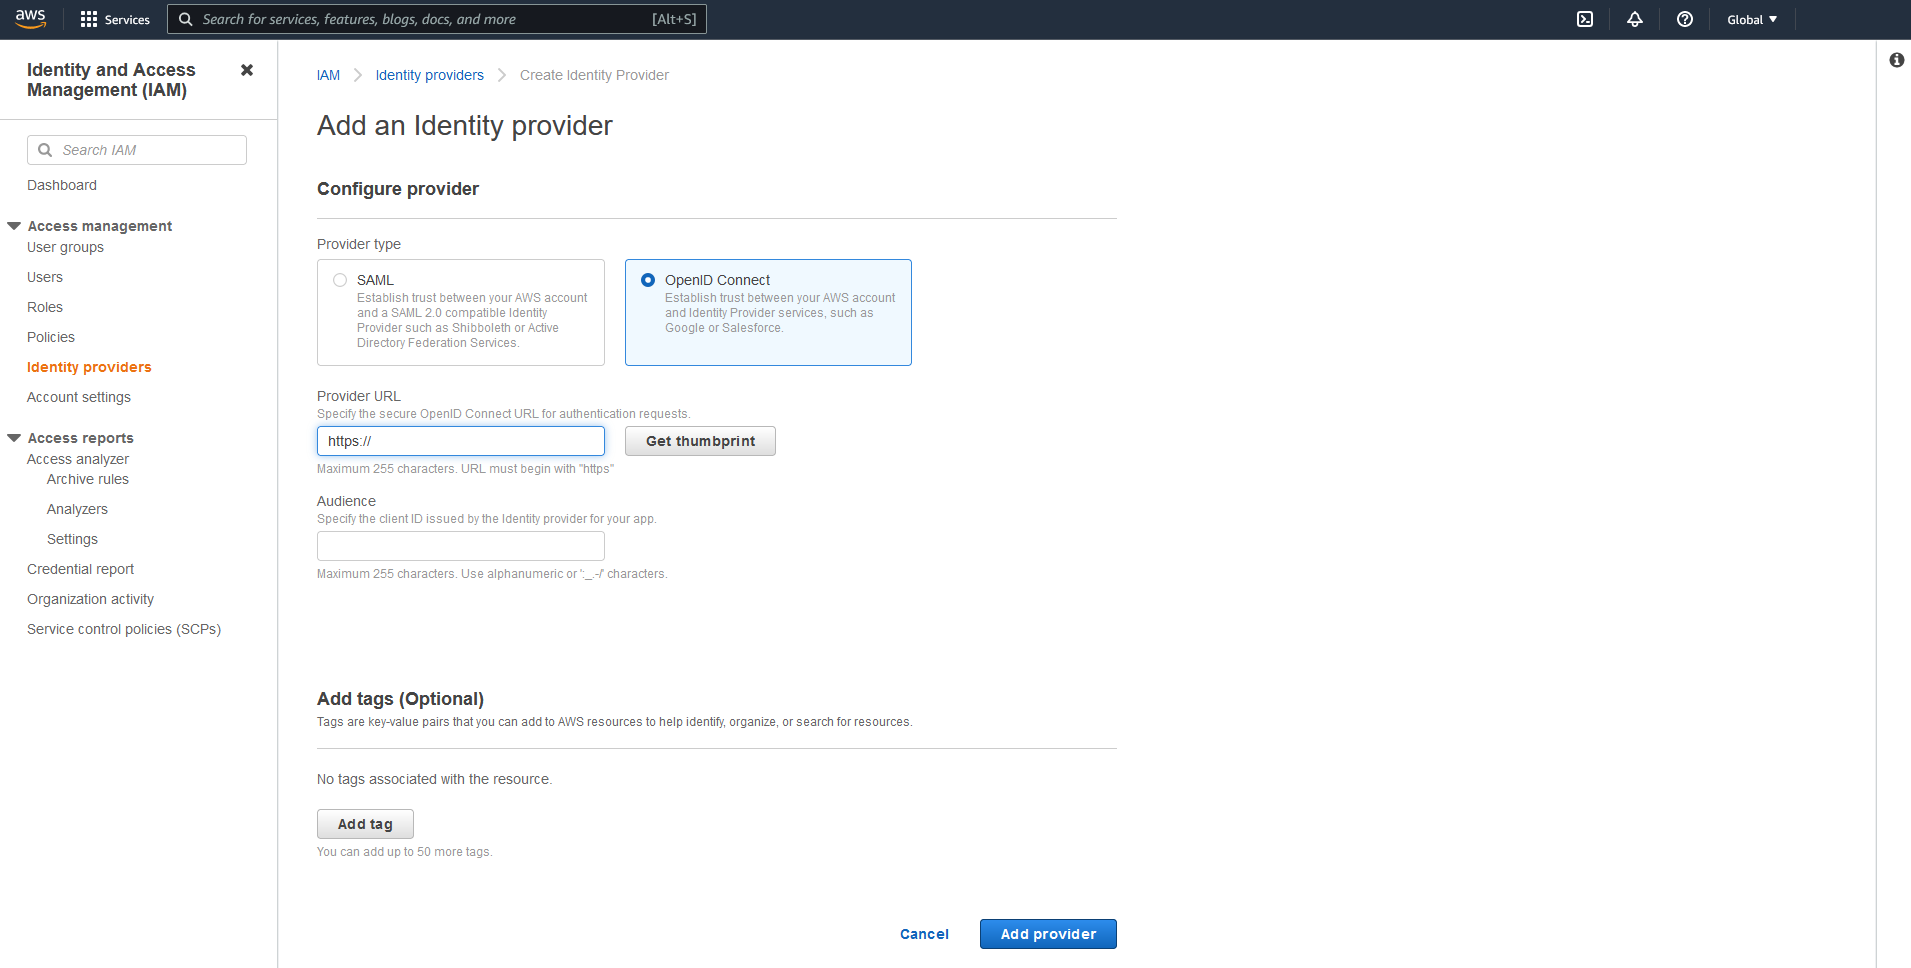
As a provider, add https://gitlab.com (or whatever url your gitlab is hosted in - it should be reachable by AWS tho).
Note: Get and verify the thumbprint, so you do not connect to something else than your target gitlab :)
As for the audience we use the same URL (in our case it’s also https://gitlab.com).
Click Add Provider and you should see your new provider in your list of identity providers.
AWS Role & Permissions
Next, we have to define our AWS Role that our gitlab runner can assume to deploy our infrastructure. We head to our IAM - add role page found at IAM > Roles > Create role:
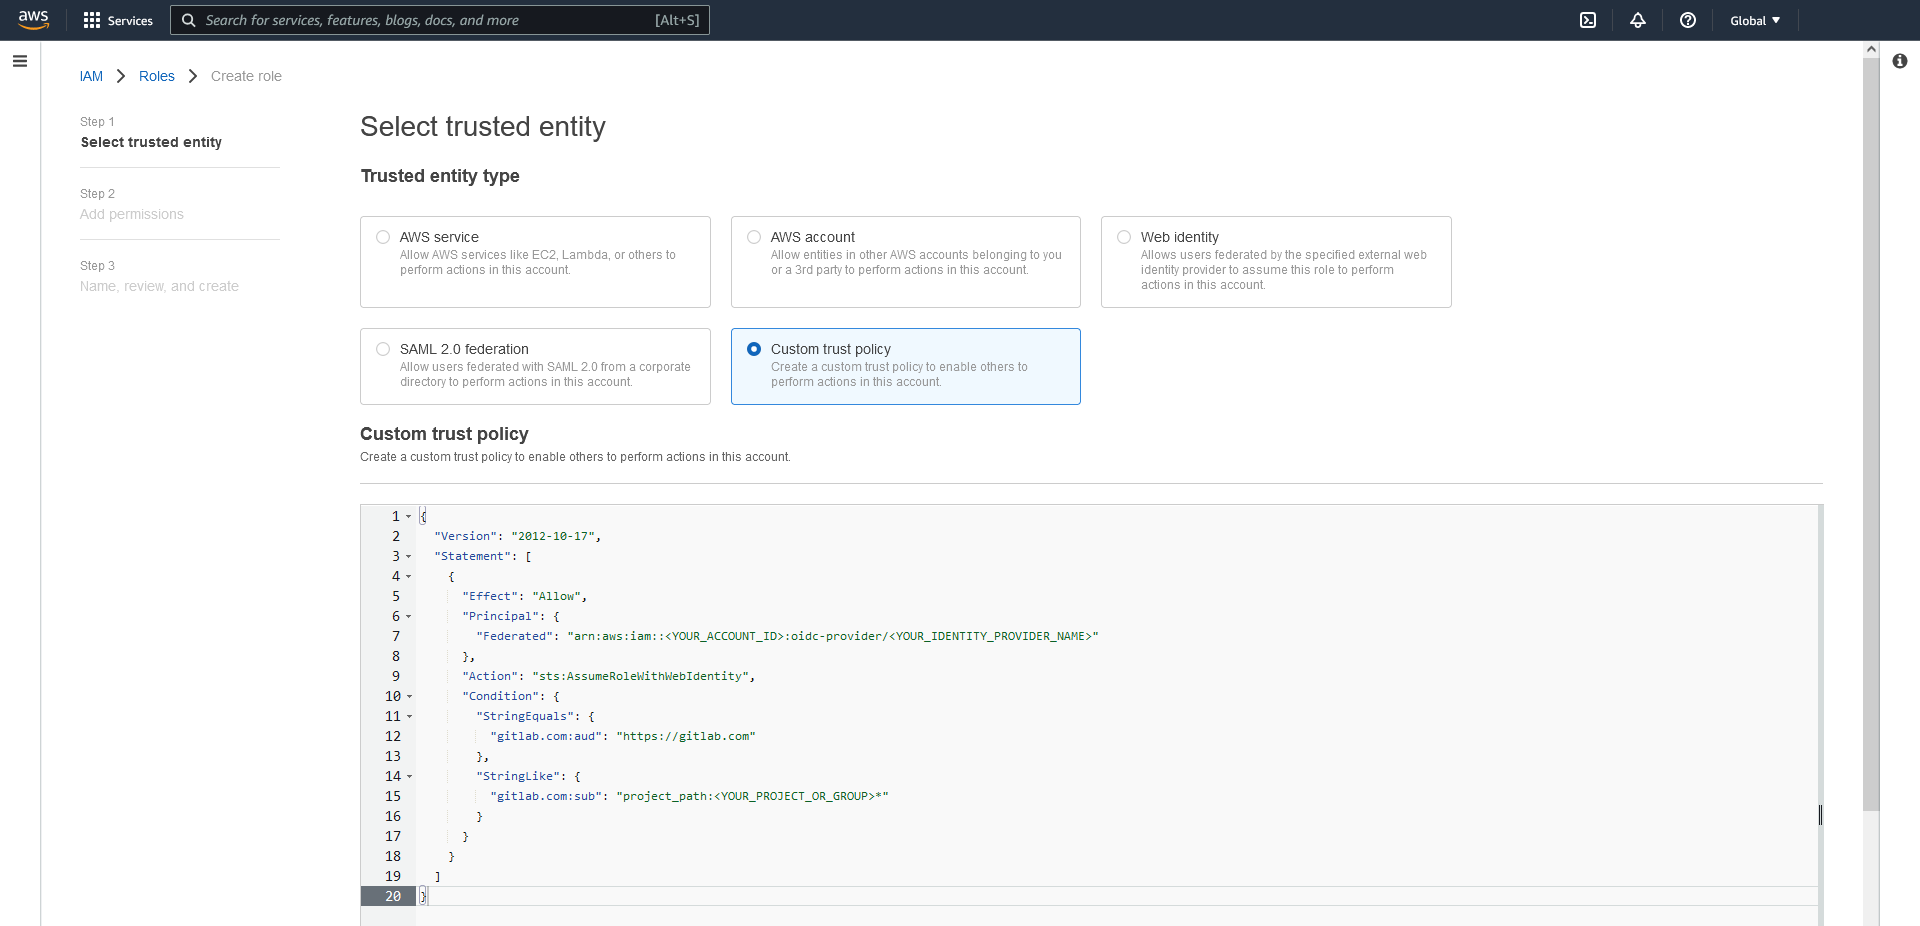
And choose to add a new Custom Identity. In the field below, add the following json and adjust it.
{
  "Version": "2012-10-17",
  "Statement": [
    {
      "Effect": "Allow",
      "Principal": {
        "Federated": "arn:aws:iam::<YOUR_ACCOUNT_ID>:oidc-provider/<YOUR_IDENTITY_PROVIDER_NAME>"
      },
      "Action": "sts:AssumeRoleWithWebIdentity",
      "Condition": {
        "StringEquals": {
          "gitlab.com:aud": "https://gitlab.com"
        },
        "StringLike": {
          "gitlab.com:sub": "project_path:<YOUR_PROJECT_OR_GROUP>*"
        }
      }
    }
  ]
}
On the following page, we can add a policy that grants the gitlab pipeline role rights to deploy the infrastructure that we want to build with our IaC (e.g. the permission to create an EC2 Instance,..). This dependy completely on what youre trying to deploy - and as always you should try to aim for the least privilege principle.
Note: The JWT allows very fine grade information about the actions being performed on gitlab.
heres a sample payload:
{
  "namespace_id": "0123456789",
  "namespace_path": "example",
  "project_id": "13",
  "project_path": "example/project",
  "user_id": "1",
  "user_login": "user",
  "user_email": "user@example.de",
  "pipeline_id": "27",
  "pipeline_source": "push",
  "job_id": "012345",
  "ref": "master",
  "ref_type": "branch",
  "ref_protected": "true",
  "jti": "990gfttg-122g-999e-b776-76789s987s09",
  "iss": "https://gitlab.com",
  "iat": 0393980344,
  "nbf": 0393980339,
  "exp": 0393983944,
  "sub": "project_path:example/project:ref_type:branch:ref:master",
  "aud": "https://gitlab.com"
}
As you can see, the sub property gives you precise information about the project and branch.
So you can define different IAM roles with different access levels into your account for different
branches, tags etc.
Always at least limit the access down to a group level in order to limit the
projects, that are allowed to use the federation.
Sadly STS currently only allows a specific subset of condition keys for federated identities (source):
- amr
- aud
- id
- oaud
- sub
So currently you can only use sub to control the access via trust policy.
Gitlab Pipeline
The last step is to configure your gitlab CI/CD pipeline to use your JWT.
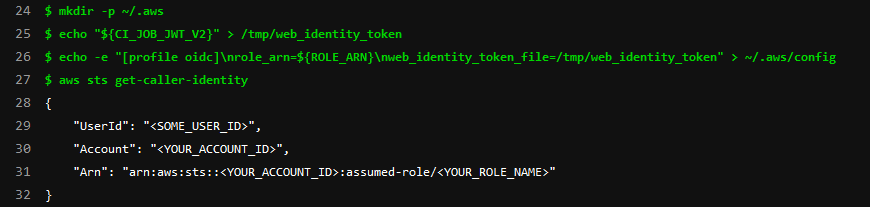
The pipeline is set up in your .gitlab-ci.yml file. Heres an example code of how to retrieve the JWT:
before_script:
  - mkdir -p ~/.aws
  - echo "${CI_JOB_JWT_V2}" > /tmp/web_identity_token
  - echo -e "[profile oidc]\nrole_arn=${ROLE_ARN}\nweb_identity_token_file=/tmp/web_identity_token" > ~/.aws/config

test-access:
  image:
    name: "amazon/aws-cli:latest"
    entrypoint: [""]
  variables:
    AWS_REGION: eu-west-1
    AWS_PROFILE: oidc
  script:
    - aws sts get-caller-identity
The gitlab ci/cd job output should look something like this (except with your account ID, etc.)
before_script
The before_script creates an shared credential profile that can be used in the following steps of your pipeline by just using AWS_PROFILE.
${CI_JOB_JWT_V2}
Is one of the predefined variables that gitlab creates when you execute a gitlab pipeline. It contains the JWT signed by gitlab which can be used for the identity federation with AWS and allows our pipeline runner to assume our IAM Role.
You can find more information about those variables here.
${ROLE_ARN}
I saved the ARN of the role I created in my gitlab repository variables, so the ci pipeline remains clean and can be reused without having to edit it every time I set up a new pipeline. You could also replace the variable with the actual Role ARN instead.

Alternative
Instead of creating an shared profile you could also use sts directly to retrieve the access token. Tho this increases the risk of credentials ending up in an CI log output - and that’s nothing we want to happen.
test-access:
  image:
    name: "amazon/aws-cli:latest"
    entrypoint: [""]
  script:
    - aws sts assume-role-with-web-identity --duration-seconds 900 --role-session-name "cicd" --role-arn <YOUR_ROLE_ARN> --web-identity-token "${CI_JOB_JWT_V2}"
Conclusion
As you see, its pretty easy to set up OIDC as identity provider to deploy AWS resources via gitlab ci. It is even possible to narrow down the access to only one gitlab repository, project or even the used tag - and you don’t have to worry about rotating keys ever again (well, at least not for your ci/cd pipeline).
At very last: big shoutout & thanks to Wolfi for setting the fundamentals for this blogpost and of course the whole ventx team for the support ❤️🙏