In a previous insightful post by a collegue of mine, titled Connect your Gitlab CI/CD pipeline to AWS via OIDC the author discussed the basics of connecting GitLab Pipelines with AWS using OpenID Connect. Building upon her valuable insights, this post will deal with the deprecation of CI_JOB_JWT_V2, which was announced with GitLab 15.9 and will be removed with GitLab 17 (May 2024 Read here…) Instead we will use id_tokens which were introduced with Gitlab 15.7. But first lets have a quick refresh on what OIDC actually is.
1. Using OIDC - OpenID Connect
OIDC is a way to let developers authenticate services and users without having to manage keys or passwords.
An Identity Provider (in our case GitLab) sends a signed JWT read ‘jot’ (JSON web token) to AWS Security Token Service Api via an AssumeRoleWithWebIdentity call and receives in return a Temporary Security Credential, that allows the GitLab Runner certain actions (depends on the defined AWS Role) on the AWS account.
2. Workflow
Lets have a look on how the authentication and authorization with OIDC in general work. Lets say we would like to use the IaC approach (i.e. Infrastructure as Code) and deploy a new S3 Bucket to our AWS account.
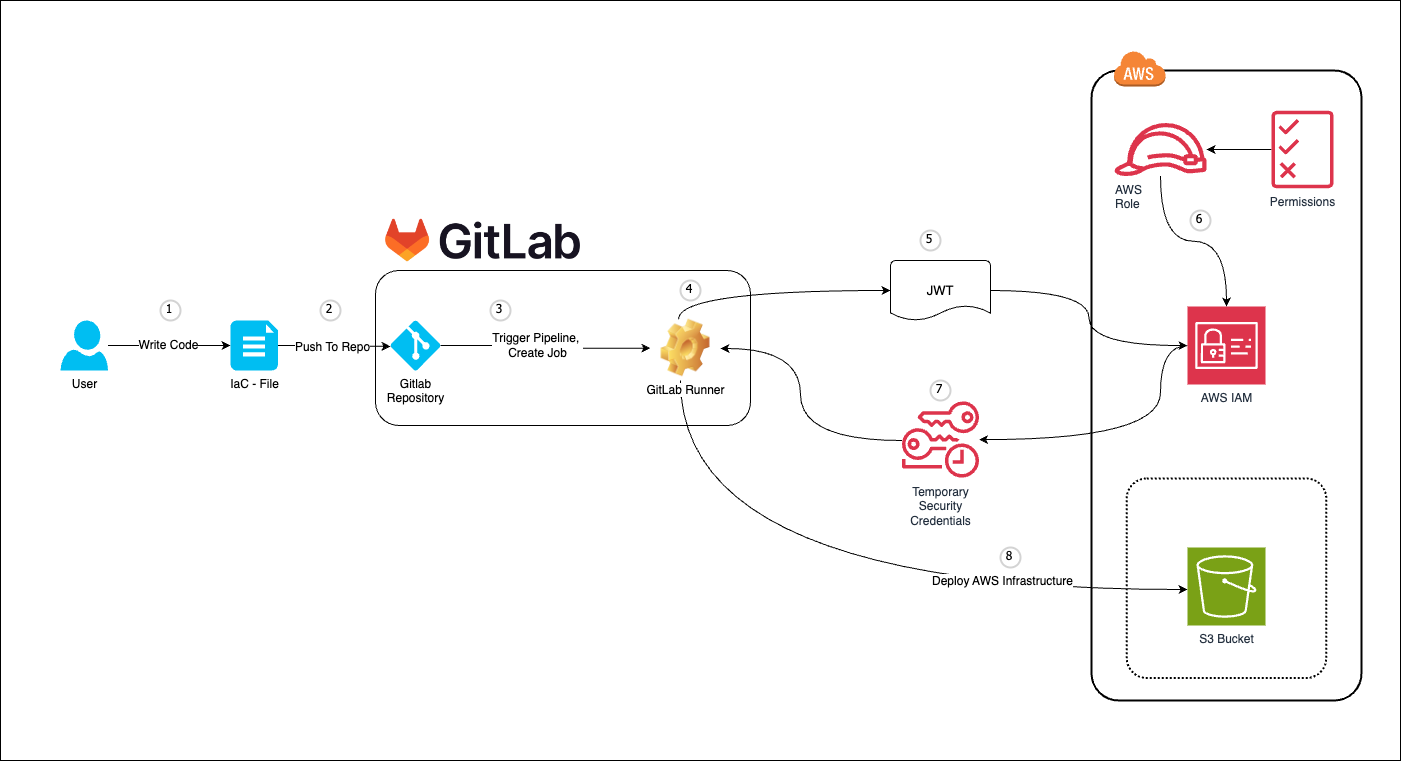
(1) We would create/write our infrastructure files
(2) Push the code to our GitLab repository
(3) This would trigger our CI/CD pipeline and create a job.
(4) The job would be executed by a Gitlab Runner that holds a signed JWT.
(5) The GitLab Runner passes the JWT to assume an AWS Role via the AssumeRoleWithWebIdentity call.
(6) AWS would take the JWT that provides user-information and assign an AWS Role that has certain permissions in our AWS account which we require for the job.
(7) Based on that information, AWS would then generate Temporary Security Credentials and send them back as a response to the Gitlab Runner.
(8) The Gitlab Runner is now authorized (based on the defined permissions in our AWS Role) to manipulate (create / change / delete) the resources in our case a S3 Bucket we provided via our Infrastucture Code.
(9) After the job is finished the Temporary Security Credentials will expire again.
2. Higher Security with GitLab 17
With the release of version 15.9, GitLab announced a deprecation of the predefined variables CI_JOB_JWT, CI_JOB_JWT_V1 and CI_JOB_JWT_V2 in favor of ID tokens which were introduced with GitLab 15.7.
ID tokens are used to create JSON web tokens that support OIDC. In contrary to the previously used predefined variable CI_JOB_JWT_V2 which held a static audience claim (aud:), you can now configure this reserved claim, which identifies the audience the JWT is intended for.
It supports followig inputs:
- A single string
- an array of strings
- or a CI/CD variable
Furthermore GitLab increased its security of the JWT tokens. Now you can restrict the tokens from being available in the whole pipeline (like with CI_JOB_JWTs) by specifying the exact jobs that would need them. Therefor “the risk of a compromised job leaking a token is reduced.” Read
3. How to set up OIDC
Prerequisits:
- GitLab 15.7 or higher!
- GitLab Repo from where we want to gain access to AWS
- AWS Account with access to the AWS Access Managment Service
Step 1: Setting up a new Identity Provider in AWS
To add a new Identity Provider in AWS go to IAM > Identity Providers > Add Provider .
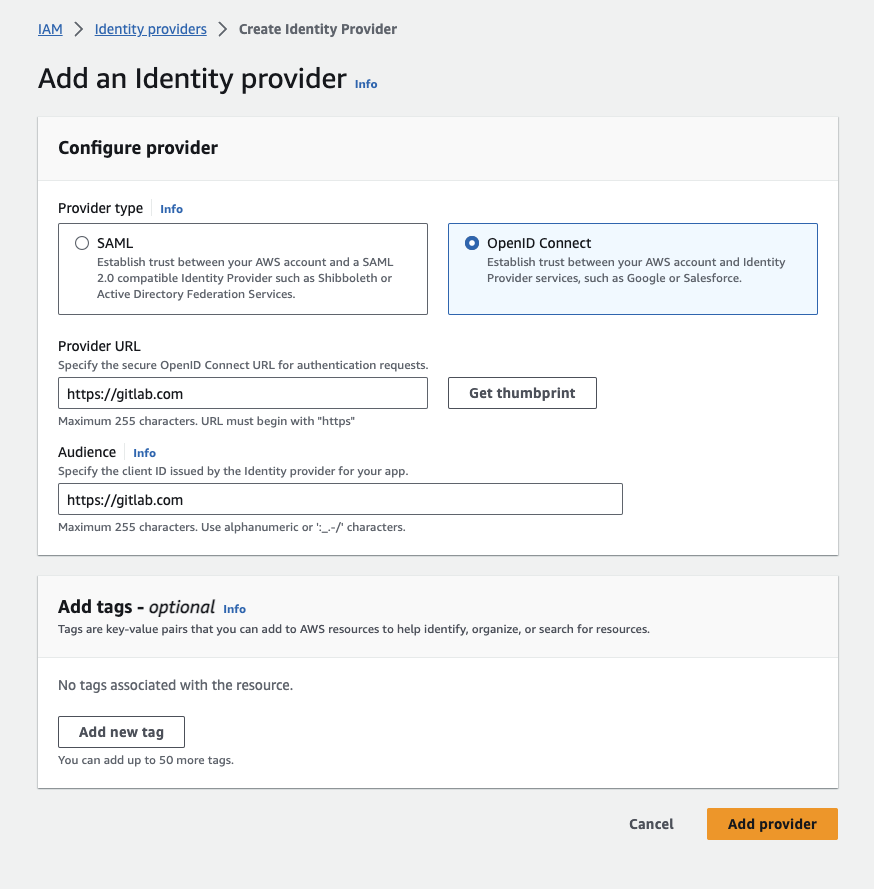
- We choose OpenID Connect as our Provider Type and enter our GitLab URL
https://gitlab.comas for the Provider URL. (Caution! If you host your own GitLab Server, be sure it is reachable by AWS and you provide the URL of your instance!) - After entering our GitLab URL we have to verify the thumbprint, in order to assure we don’t connect to something else than our target GitLab instance.
- For the Audience URL we provide the same as for the Provider URL.
Finally click on Add provider to finish this step.
Step 2. Create a new AWS Role:
Now we want to create a new AWS Role that our GitLab Runner can assume to deploy our infrastructure. We go to IAM > Roles > Create role
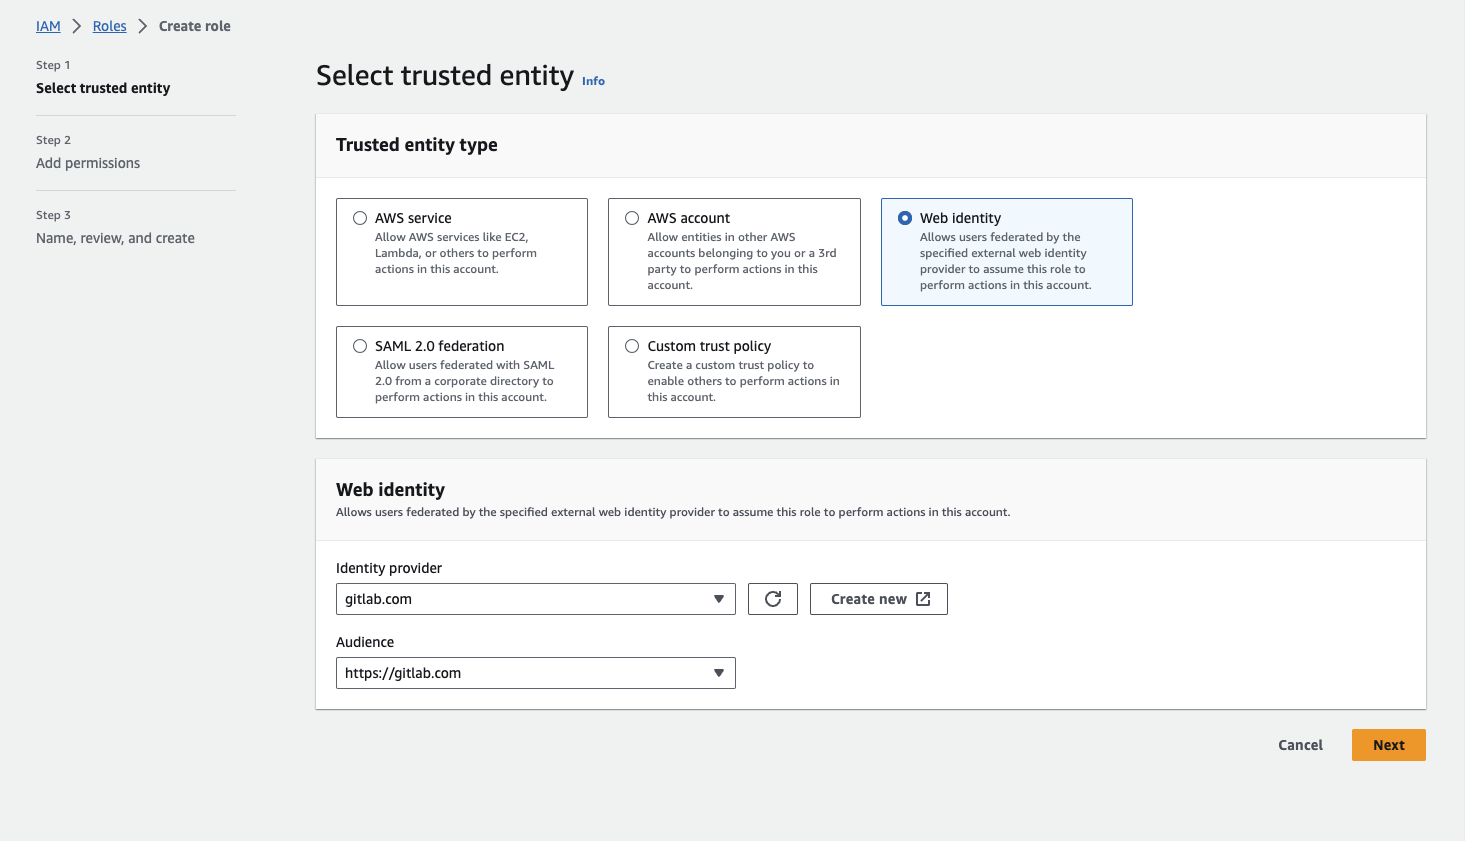
We choose to add a new Web Identity in order to get a template for our Trust Policy. Under Identity Provider we select our own Identity Provider we just created in the last step and choose for our Audience the URL to our GitLab.
As for now we can skip adding the Permission Policies (we will add them later). On the next page we can copy the generated Trust Policy to our clipboard and click on Edit in the right corner. Since AWS doesn’t allow us to edit this Policy by hand, we need to create a Custom Trust Policy instead.
 Now we can paste the Trust Policy from our clipboard into the
 Custom trust policy section. At this point our Policy is incomplete, because we want to specify our grant access to one project in our GitLab - so we add a sub.
{
    "StringLike": {
        "<provider_URL>:sub": "project_path:<YOUR_PROJECT_OR_GROUP>*"
    }
}
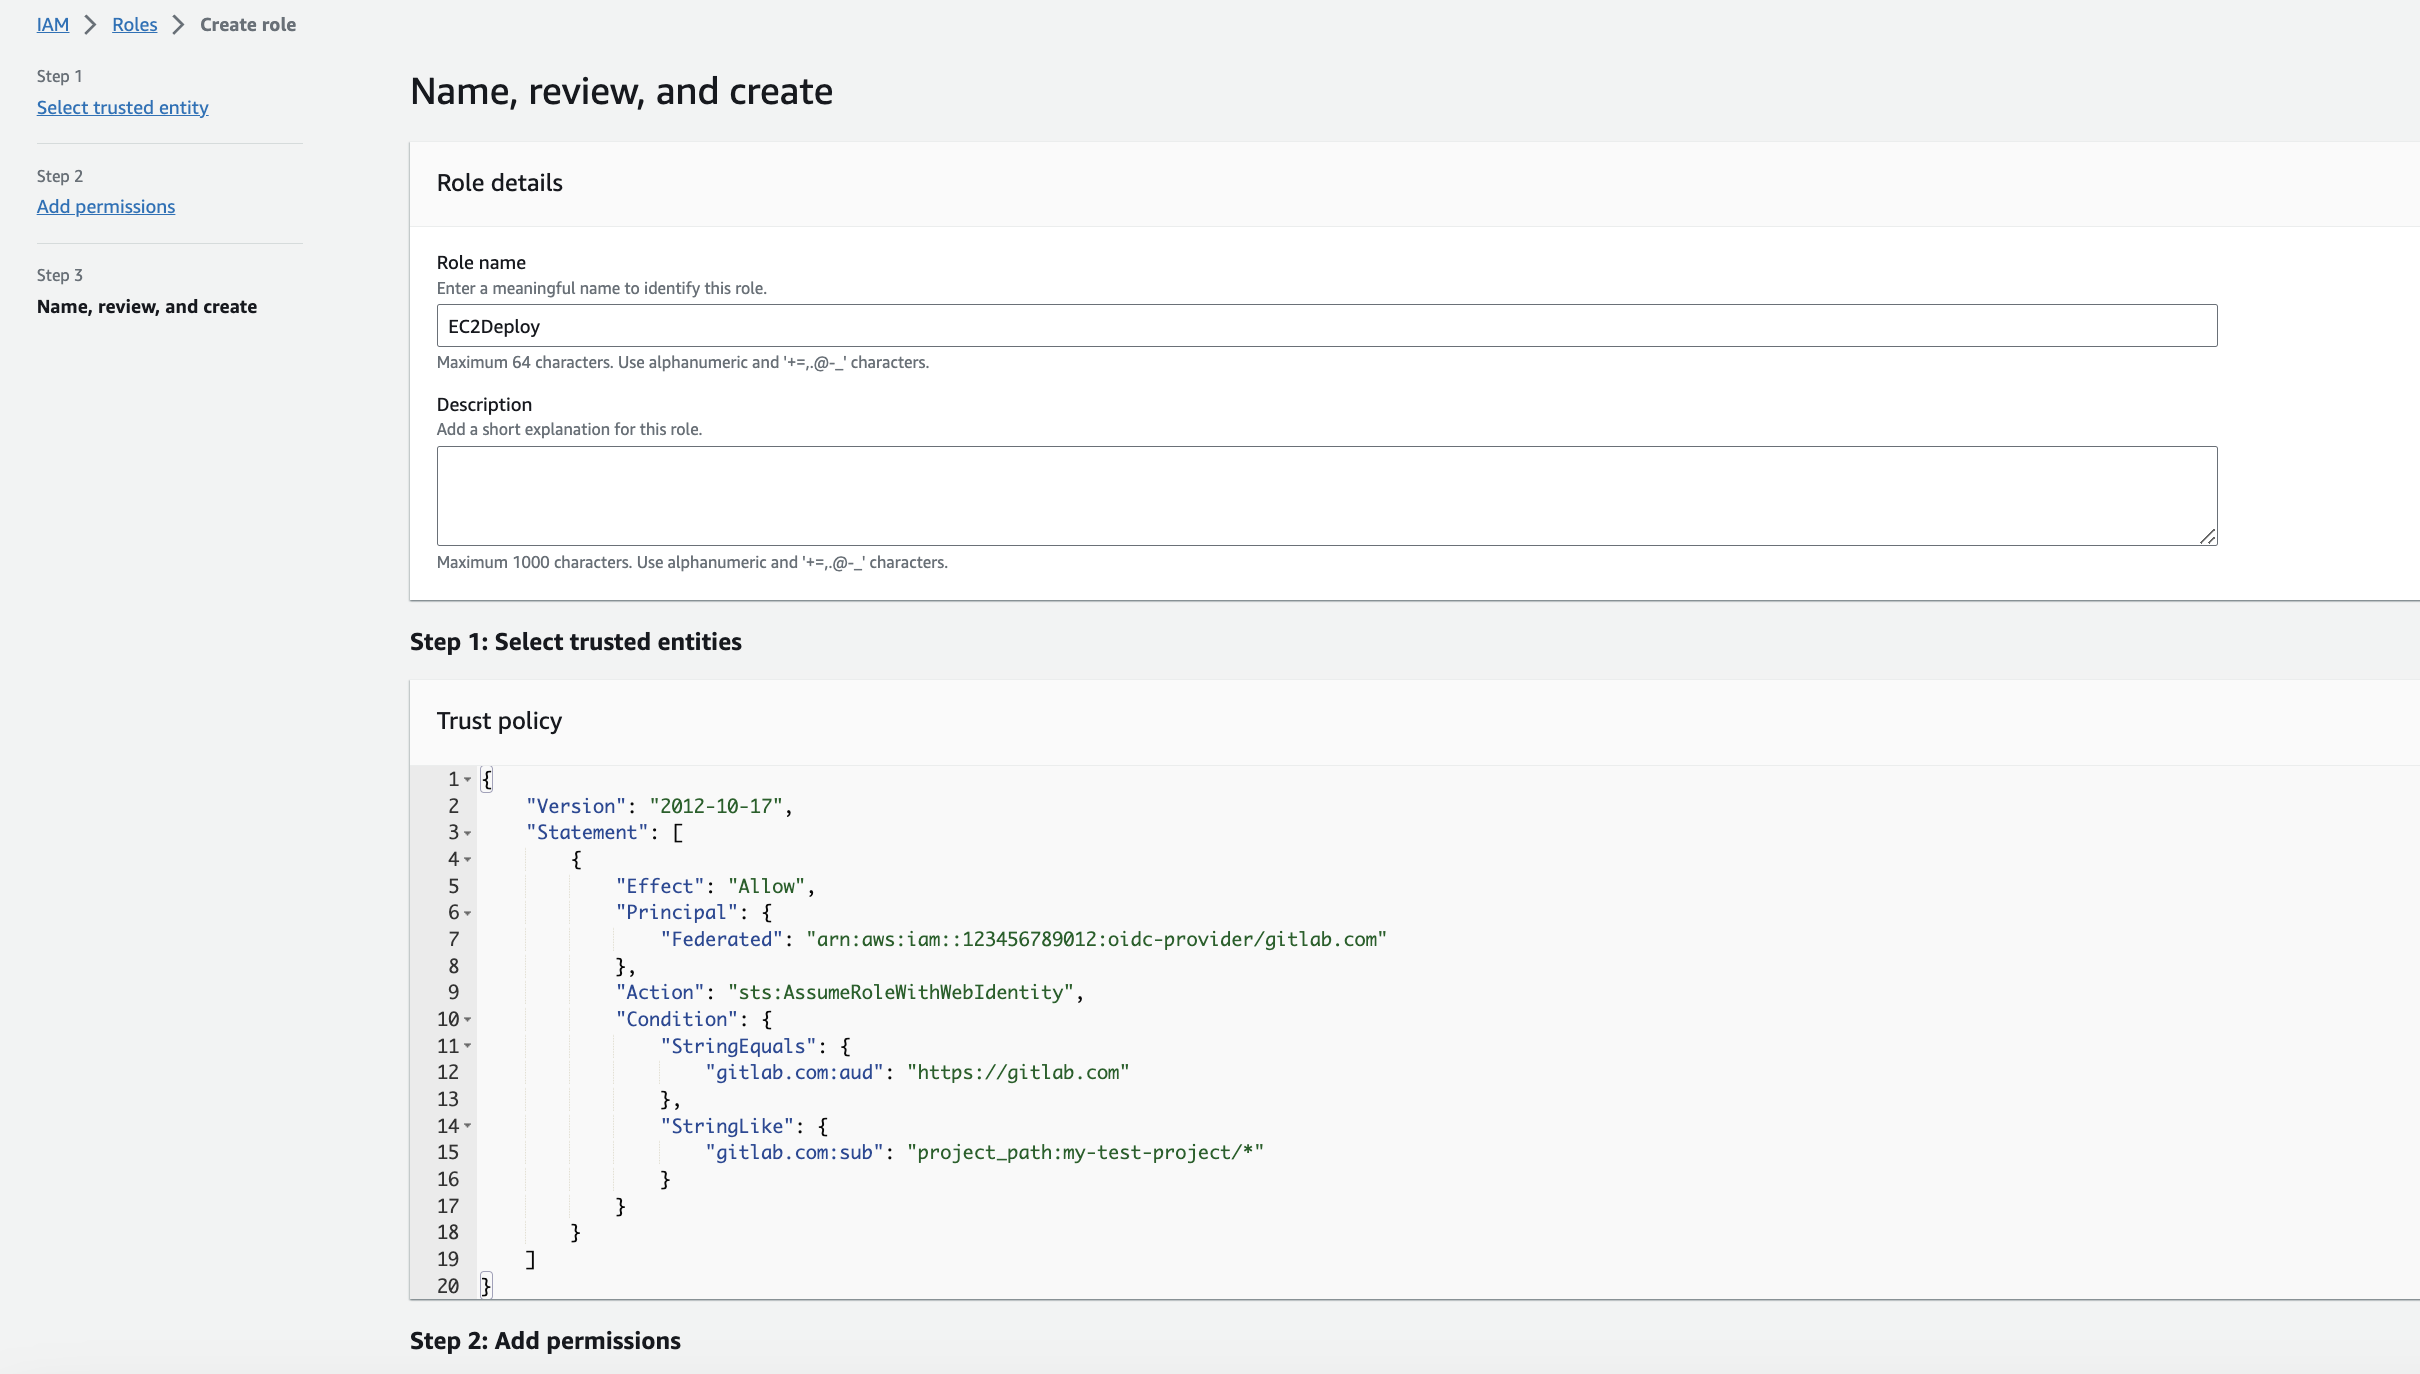
So the final Trust Policy should look something like this:
{
  "Version": "2012-10-17",
  "Statement": [
    {
      "Effect": "Allow",
      "Principal": {
        "Federated": "arn:aws:iam::<YOUR_ACCOUNT_ID>:oidc-provider/<YOUR_IDENTITY_PROVIDER_NAME>"
      },
      "Action": "sts:AssumeRoleWithWebIdentity",
      "Condition": {
        "StringEquals": {
          "<YOUR_IDENTITY_PROVIDER_NAME>:aud": "https://<YOUR_IDENTITY_PROVIDER_NAME>"
        },
        "StringLike": {
          "<YOUR_IDENTITY_PROVIDER_NAME>:sub": "project_path:<YOUR_PROJECT_OR_GROUP>/*"
        }
      }
    }
  ]
}
Remark: With the sub condition we can granularly define from which project and branch GitLab can perform a given action on our AWS Account. This is a good approach when we want to apply the principle of seperation of duties - we define different AWS Roles with different access levels into our AWS Account for different Branches for example.
Now add the needed Permissions to our AWS Role. It all depends on what you want to do within your code - so in our case we want to provision EC2 instances, so we will go with AmazonS3FullAccess and click next. As a reminder: Keep in mind that we should always apply the least privilege principle!
Now we need to give our AWS Role a meaningful name - we will go with “S3Deploy”
Step 3. Create a Test-Pipeline in GitLab
Now we need to configure our GitLab CI/CD Pipeline to use our JWT.
First of all we want to create a variable for our AWS Role ARN. The reason is - we might want to use the same Pipeline for different AWS Roles that have access/permissions to different environments for instance. Instead of hardcoding the Role and edit the Pipeline for every Role, we can pass a Variable we define in our project. As the key will use ROLE_ARN and paste the ARN from our AWS Role we created previously.
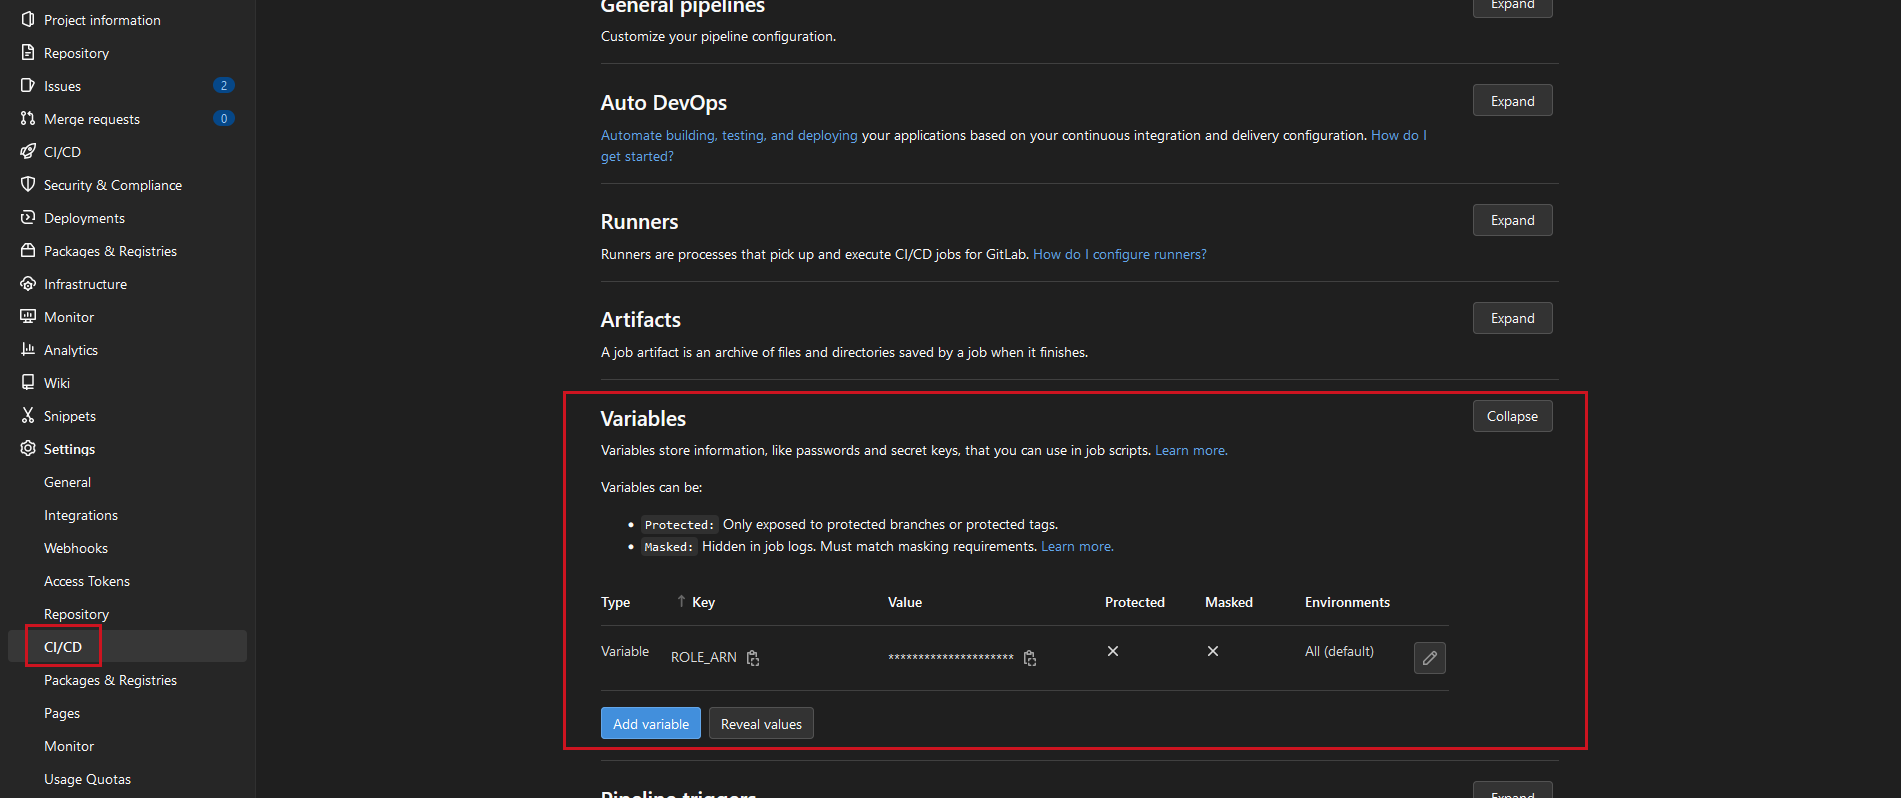
GitLab Pipeline
The last step is to implement our CI/CD pipeline in our Repository.
We are heading to our .gitlab-ci.yaml-file. Here is an example code of how to create the JWT with id_tokens:
assume role:
  id_tokens:
    MY_OIDC_TOKEN:
      aud: https://gitlab.com
  before_script:
    - mkdir -p ~/.aws
    - echo "${MY_OIDC_TOKEN}" > /tmp/web_identity_token
    - echo -e "[profile oidc]\nrole_arn=${ROLE_ARN}\nweb_identity_token_file=/tmp/web_identity_token" > ~/.aws/config
  image:
    name: "amazon/aws-cli:latest"
    entrypoint: [""]
  variables:
    AWS_REGION: eu-west-1
    AWS_PROFILE: oidc
    S3_BUCKET_NAME: "test-bucket-12355345242523423425"
  script:
    - |
        aws s3api create-bucket \
          --bucket  "${S3_BUCKET_NAME}" \
          --region "${AWS_REGION}" \
          --create-bucket-configuration LocationConstraint="${AWS_REGION}"
As we can see, this approach is pretty similar to that with CI_JOB_JWT_V2. The main difference is, that we have to define an id_token, by declaring a variable we called MY_OIDC_TOKEN and provide the audience which has to be the same as defined in our AWS Trust Policy.
So we split the pipeline in three sections - in the first we declare our id_tokens to create our JWT, in the before script we will create a shared profile oidc as we did before, but instead of providing CI_JOB_JWT_V2 we now pass our MY_OIDC_TOKEN, so that we can use the profile in the later script in order to retrieve the neccessary access token and deploy our resource in AWS.
before_script
The before_script creates a shared credential profile that can be used in the following steps of our Pipeline by setting the AWS_PROFILE variable.
${MY_OIDC_TOKEN}
Is the ID Token we created that contains the JWT signed by GitLab which can be used for the identity federation with AWS and allows our Pipeline Runner to assume our AWS Role.
More information about ID Tokens here.
${ROLE_ARN}
We saved the ARN of the AWS Role that we’ve created in our GitLab repository variables, so that the CI/CD pipeline remains clean and can be reused without having to edit it every time we set up a new Pipeline.
script
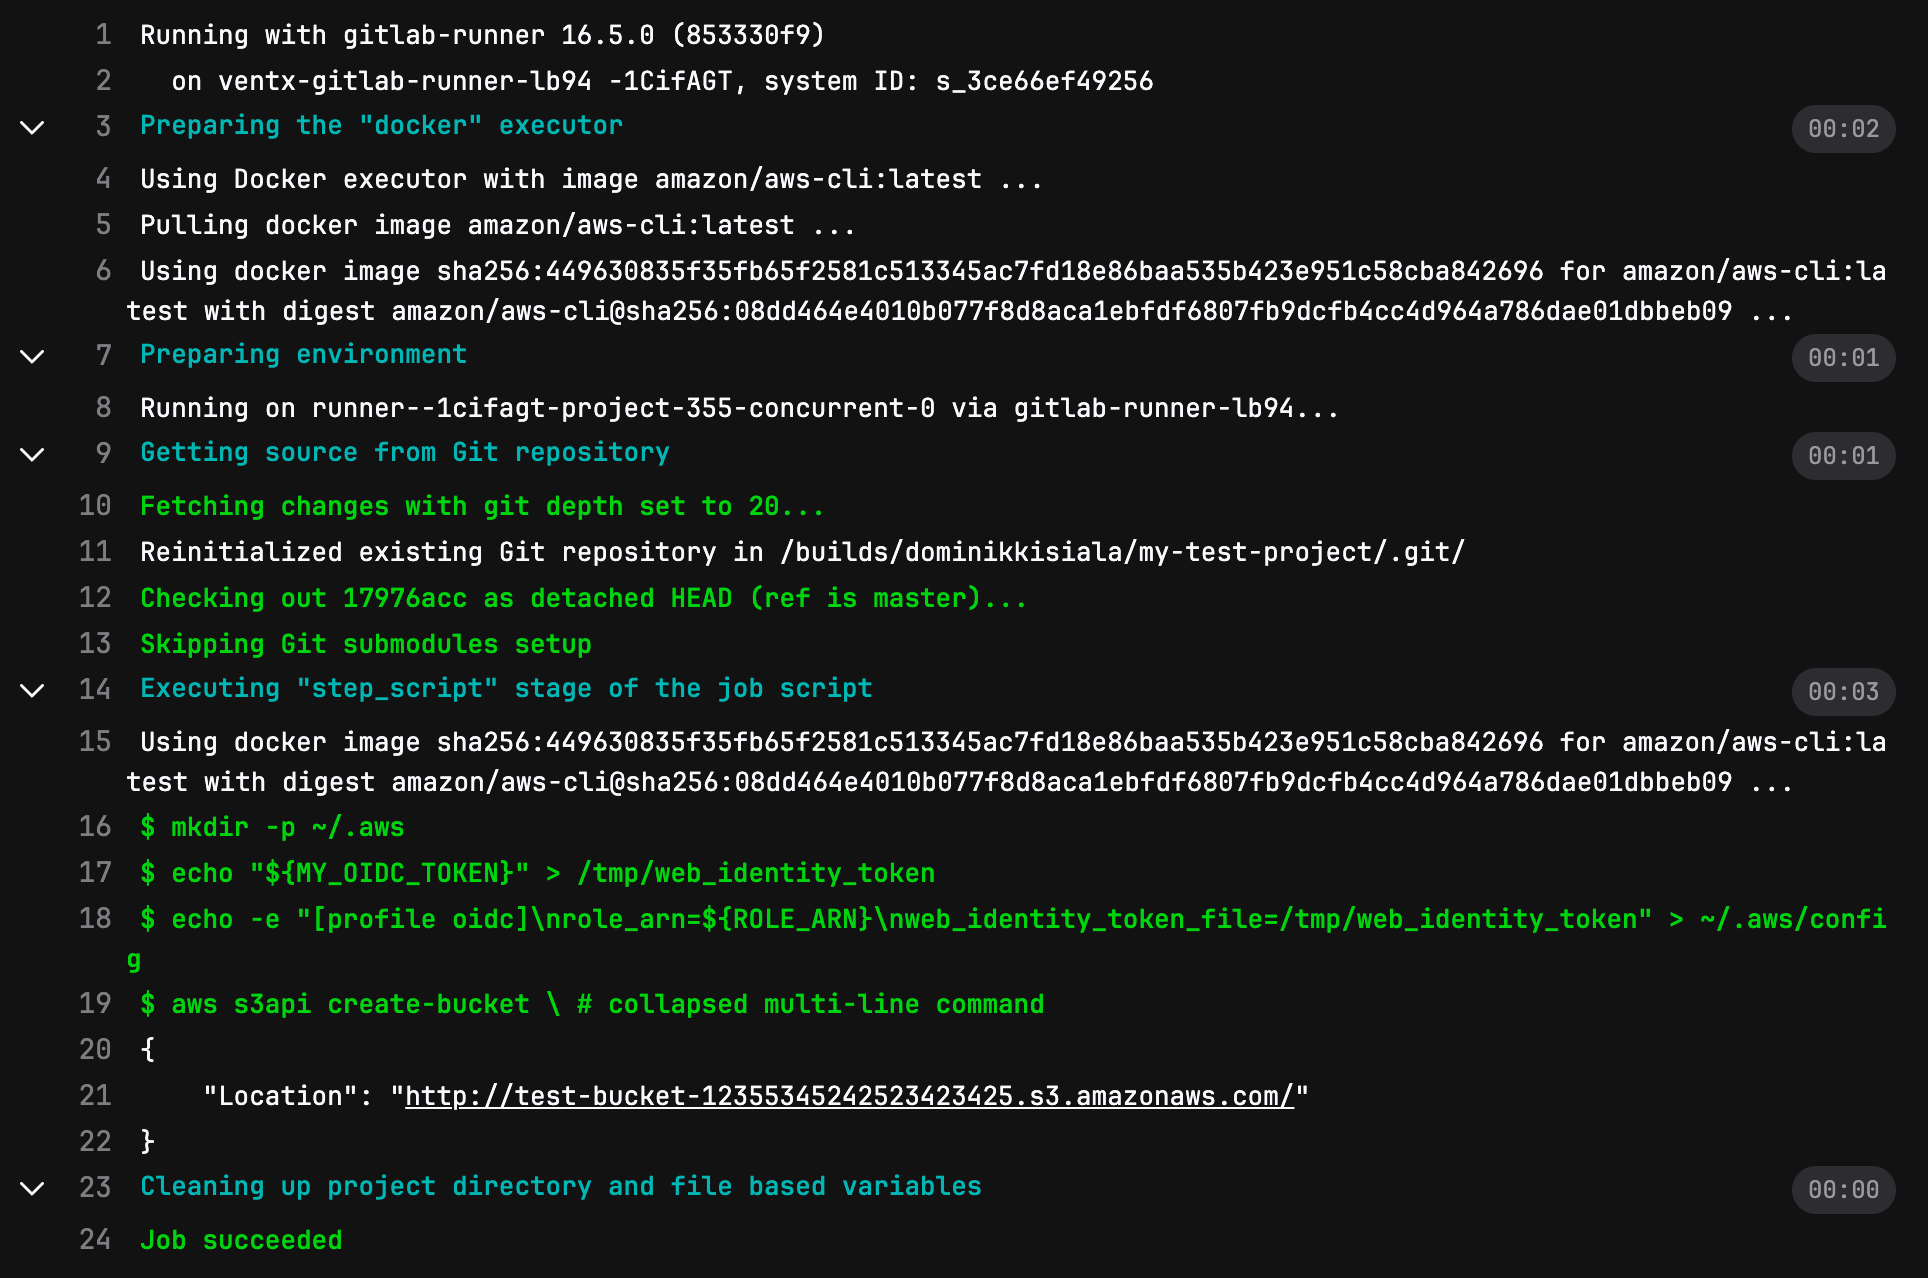
We create a S3 Bucket with the help of the AWS CLI, providing the name for the bucket, and some additional configurations
The output should look similar to this:
Conclusion
As we could see the transition from using the predefined variables like CI_JOB_JWT_V2 to using id_tokens is pretty straightforward.
The benefits of this approach are also quite obvious. With id_tokens we are given freedom to create our own JWTs when we need them and where we need them, allowing us to have full control. So it provides an easy and more secure way to authenticate and authorize our GitLab CI/CD Pipelines to perform tasks in our AWS account. Remember to update your Pipelines before the Release of GitLab 17! ;)
I would like to thank Corinna, who wrote the blogpost this one is based on and Wolfi for the technical support.